Project Sheet
Etched Glass Holiday Gift Jar
Personalized glassware makes a heartfelt gift for the holidays or any occasion.
- Difficulty Level: Beginner
- Completion Time: 1 hour
Watch a video overview:
Etched glass is elegant, timeless, and surprisingly easy to create. Choose from pre-cut stencils for your design, or make your own with just a bit more effort.
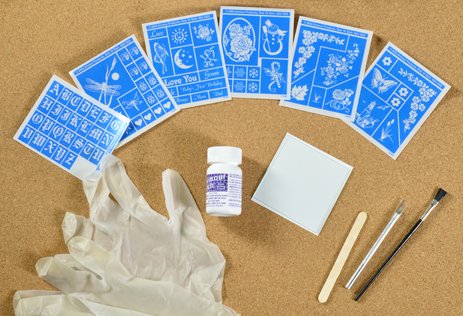 The Glass Etching Kit includes everything you’ll need to safely etch designs into glass. This includes protective gloves, which should always be worn when handling the etching cream. The blue stencils provided in the etching kit are designed for one-time use, whereas the additional Over ‘n’ Over stencils can be reused multiple times.
What You'll Need
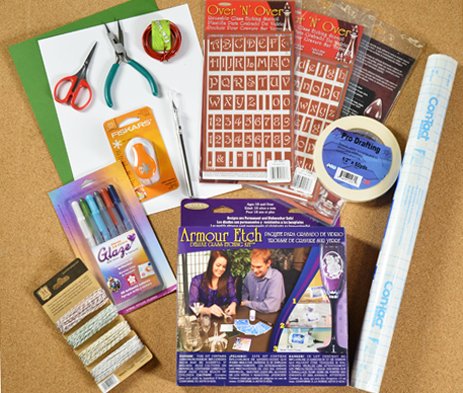 Before you begin, make sure you have all the supplies you'll need. The list below contains all the products we used to create the example shown in this demo. Materials are optional based upon your own design.
- Deluxe Glass Etching Kit
- Over ‘n’ Over Reusable Glass Etching Stencils (Alpha Lower Case & Alpha Upper Case)
- Masking Tape
- Classic 80 lb Cardstock
- Gelly Roll Glaze Pens
- True Hemp Crafters Cord
- Small Lever Punches
- Scissors
- Glue
1. Choose Your Stencil
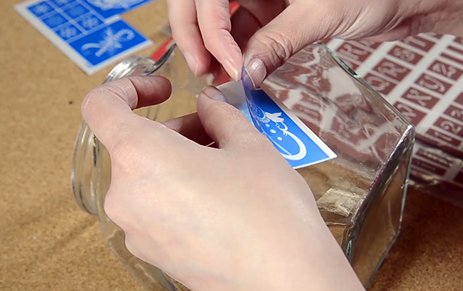 Make sure your glassware is clean and dry. Cut the intended design from the blue stencil sheet. Remove the clear sheet from the back only. Place the blue stencil directly on the glass.
2. Transfer the Design
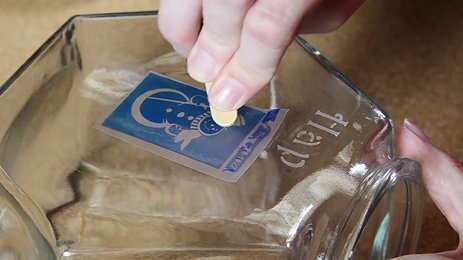 Use the included craft stick to rub over the top of the stencil. The blue coloring will begin to lighten as the design adheres to the glass.
3. Remove the Backing
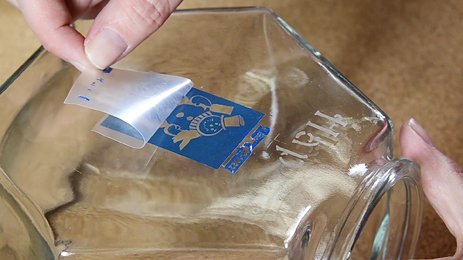 Starting at one corner, gently peel away the top clear sheet while making sure the blue image stays stuck to the glass. If parts of the design are lifting with the top sheet, recover and continue to rub as needed.
4. Mask the Edges
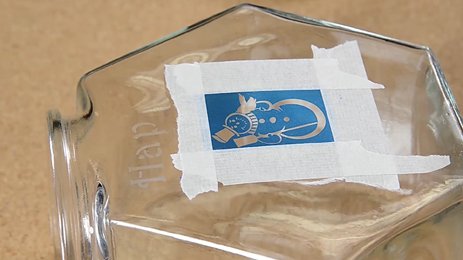 Surround the design with masking tape to avoid getting the etching cream in unintended areas. The tape should overlap the blue edges slightly to avoid stray etched lines around the image.
5. Add Your Message
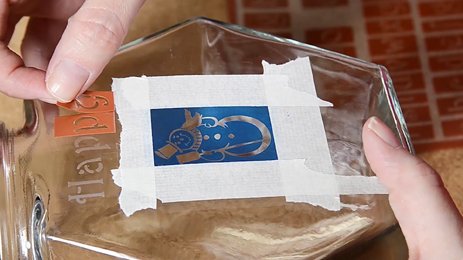 Add Over ‘n’ Over Reusable Stencils to write a message to accompany the design. These letters are self-adhesive and may be reused. You’ll see where we broke up the word “happy” to reuse the letter “p.” The letters should also be surrounded with masking tape. If the letters are spaced closely together, tape may be applied around the outside of the word without taping between the letters; however, be sure to slightly overlap the stencils to avoid unwanted lines between each letter.
6. Etch the Design
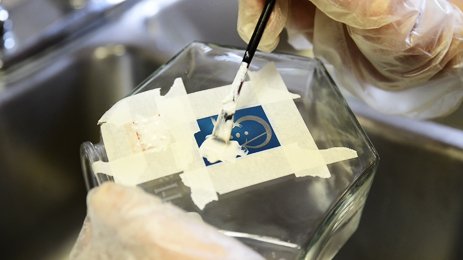 Stir the etching cream to ensure appropriate consistency and chemical mixture. Apply the cream with a brush or craft stick with thick, even coverage. Allow the cream to sit on the glass from 1 to 3 minutes.
7. Rinse and Repeat
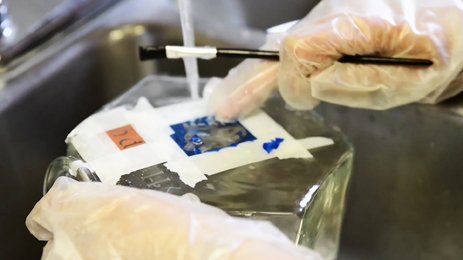 Rinse away the cream with water. Use the brush or your glove-protected fingers to wipe away cream and begin removing tape and stencils. The blue stencil may come off in pieces as it is intended for single use. With all pieces removed, wash the glass to ensure all the etching cream has been cleaned away. Dry the glassware with a towel or paper towel.
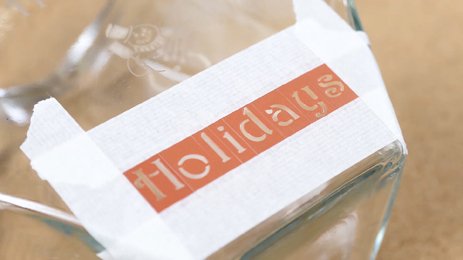 Apply additional stencils as desired to complete your design. Repeat the masking and etching processes as many times as needed. Just be sure to clean and dry the glass in between sessions.
8. Share Personal Wishes
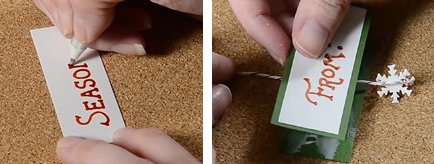 We added a seasonal tag to go with our glassware gift. Cut and layer the cardstock to the desired message size. Write the message slowly with the Gelly Roll Glaze pens to create a raised surface. The ink goes on smooth and leaves a subtle 3D glossy texture. Our design is front and back, so we sandwiched the striped cord between the messages. A blank backing could also be used or the string could be hole punched through the cardstock rather than glued.
9. Final Touches
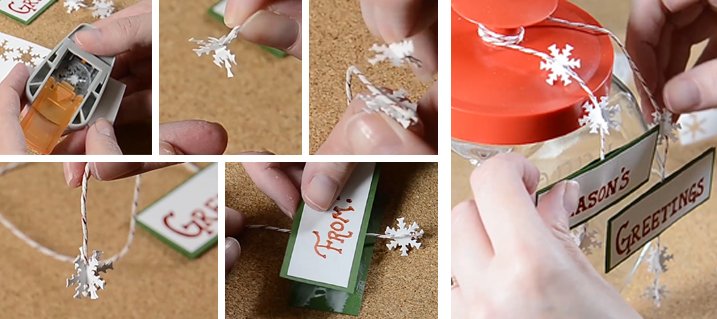 Along the length of the string, we created 3D snowflakes. Punch four snowflakes out of the white cardstock and fold each in half. Match up the edges and glue them in pairs. Place one pair with the string running down the center, and glue on another pair to complete the 3D snowflake. Fill the jar with baked goods, candy, or other holiday treats to complete this customizable gift.
More Project Sheets

Glow-in-the-Dark Mirror
- Difficulty Level: Beginner-Intermediate
- Completion Time: 2 Hours

Tools Silhouette Sign for Dad
- Difficulty Level: Beginner-Intermediate
- Completion Time: 1-2 Days

DIY Acrylic Pour Bracelet
- Difficulty Level: Beginner
- Completion Time: 2-3 Days

DIY Mason Jar Planter
- Difficulty Level: Advanced
- Completion Time: 2-3 Days

Marbled Ornament
- Difficulty Level: Beginner
- Completion Time: 1-2 hours

Clay Pumpkin Jar
- Difficulty Level: Beginner
- Completion Time: 1-2 hours

Pro Glow Tape Skull
- Difficulty Level: Beginner
- Completion Time: 1 hour

Personalized Pencil Pouch
- Difficulty Level: Beginner
- Completion Time: 1 hour (plus drying time)

Decorate Your Own Birdhouse
- Difficulty Level: Beginner
- Completion Time: 2-4 hours

Transparent Photo with High Gloss
- Difficulty Level: Beginner
- Completion Time: 1.5 hours

Sketching with Graphite Putty
- Difficulty Level: Beginner
- Completion Time: 8 hours

Scratch Art with Color Accents
- Difficulty Level: Beginner/Intermediate
- Completion Time: 1-3 hours

Polymer Clay Fairy House
- Difficulty Level: Intermediate
- Completion Time: ~8 hours

Experiment with Resin Casting
- Difficulty Level: Beginner/Intermediate
- Completion Time: 1-2 hours (pre-cure)

Color-Splash Vision Board
- Difficulty Level: Beginner
- Completion Time: 3-4 hours

Etched Glass Holiday Gift Jar
- Difficulty Level: Beginner/Intermediate
- Completion Time: 1 hour

Create a colorful reminder of the good things in life
- Difficulty Level: Beginner/Intermediate
- Completion Time: 1 hour

Face Painting with Custom Stencils
- Difficulty Level: Beginner/Intermediate
- Completion Time: 1 hour

Art Deco Pendant with Polymer Clay
- Difficulty Level: Beginner
- Completion Time: 1 hour

Transfer Designs with Lazertran
- Difficulty Level: Beginner
- Completion Time: 15-20 minutes

Multimedia Painting with PanPastels
- Difficulty Level: Beginner/Intermediate
- Completion Time: 1-2 hours

Special Effects with Brusho Colors
- Difficulty Level: Beginner/Intermediate
- Completion Time: 1-2 hours

Make Your Own Paper Quilling Frame
- Difficulty Level: Beginner/Intermediate
- Completion Time: 10 hours

Make Your Own Greeting Cards
- Difficulty Level: Beginner
- Completion Time: 10-30 Minutes

Make Your Own Autumn Leaves Stained-Glass
- Difficulty Level: Beginner/Intermediate
- Completion Time: 1-2 hours

Make Your Own Magnetic Alien Message Board
- Difficulty Level: Beginner
- Completion Time: 2 hours

Make Your Own Compact Disc Drink Coasters
- Difficulty Level: Beginner
- Completion Time: 2 hours

Make Your Own Crayon Candles
- Difficulty Level: Intermediate
- Completion Time: 4 hours

Make Your Own Kite
- Difficulty Level: Intermediate
- Completion Time: 3 hours

Make Your Own Masquerade Ball Masks
- Difficulty Level: Intermediate
- Completion Time: 2.5 hours

Make Your Own Multimedia Greeting Card
- Difficulty Level: Intermediate
- Completion Time: 2 hours

Make Your Own Bouquet of Photo Flowers
- Difficulty Level: Beginner
- Completion Time: 1 hours

Make Your Own Rock Zoo
- Difficulty Level: Beginner
- Completion Time: 2 hours

Make You Own Custom Sketchbook
- Difficulty Level: Intermediate
- Completion Time: 2 hours

Make Your Own Stained Glass Window
- Difficulty Level: Beginner
- Completion Time: 2 hours

Make Your Own Oil Painting T-Shirt
- Difficulty Level: Intermediate
- Completion Time: 24 hours

Make Your Own Paper Mache Bowl
- Difficulty Level: Intermediate
- Completion Time: 24 hours


